
 OpenCV目标追踪算法
目前OpenCV4.2版本中自带了8个目标跟踪算法的实现。
- **BOOSTING:**算法原理类似于Haar cascades (AdaBoost),是一种很老的算法。这个算法速度慢并且不是很准。
- MIL:比BOOSTING准一点。
- KCF:速度比BOOSTING和MIL更快,与BOOSTING和MIL一样不能很好地处理遮挡问题。
- CSRT:比KCF更准一些,但是速度比KCF稍慢。
- **MedianFlow:**对于快速移动的目标和外形变化迅速的目标效果不好。
- **TLD:**会产生较多的false-positives。
- MOSSE:算法速度非常快,但是准确率比不上KCF和**CSRT。**在一些追求算法速度的场合很适用。
- **GOTURN:**OpenCV中自带的唯一一个基于深度学习的算法。运行算法需要提前下载好模型文件。
综合算法速度和准确率考虑,个人觉得CSRT、KCF、MOSSE这三个目标跟踪算法较好。
# 使用OpenCV来目标跟踪
新建文件opencv_objecttracking.py。代码如下,首先使用TrackerXXX_create()方法创建目标跟踪类对象,然后调用tracker.init方法初始化需要跟踪的目标,这里使用了cv2.selectROI来手动选择目标框,然后使用tracker.update方法来跟踪目标,最后将跟踪结果可视化出来。
# import the necessary packages
from imutils.video import VideoStream
from imutils.video import FPS
import argparse
import imutils
import time
import cv2

# construct the argument parser and parse the arguments
ap = argparse.ArgumentParser()
ap.add_argument("-v", "--video", type=str,
	help="path to input video file")
ap.add_argument("-t", "--tracker", type=str, default="kcf",
	help="OpenCV object tracker type")
args = vars(ap.parse_args())

# extract the OpenCV version info
(major, minor) = cv2.__version__.split(".")[:2]
# if we are using OpenCV 3.2 OR BEFORE, we can use a special factory
# function to create our object tracker
if int(major) == 3 and int(minor) < 3:
	tracker = cv2.Tracker_create(args["tracker"].upper())
# otherwise, for OpenCV 3.3 OR NEWER, we need to explicity call the
# approrpiate object tracker constructor:
else:
	# initialize a dictionary that maps strings to their corresponding
	# OpenCV object tracker implementations
	OPENCV_OBJECT_TRACKERS = {
		"csrt": cv2.TrackerCSRT_create,
		"kcf": cv2.TrackerKCF_create,
		"boosting": cv2.TrackerBoosting_create,
		"mil": cv2.TrackerMIL_create,
		"tld": cv2.TrackerTLD_create,
		"medianflow": cv2.TrackerMedianFlow_create,
		"mosse": cv2.TrackerMOSSE_create
	}
	# grab the appropriate object tracker using our dictionary of
	# OpenCV object tracker objects
	tracker = OPENCV_OBJECT_TRACKERS[args["tracker"]]()
# initialize the bounding box coordinates of the object we are going
# to track
initBB = None

# if a video path was not supplied, grab the reference to the web cam
if not args.get("video", False):
	print("[INFO] starting video stream...")
	vs = VideoStream(src=0).start()
	time.sleep(1.0)
# otherwise, grab a reference to the video file
else:
	vs = cv2.VideoCapture(args["video"])
# initialize the FPS throughput estimator
fps = None

# loop over frames from the video stream
while True:
	# grab the current frame, then handle if we are using a
	# VideoStream or VideoCapture object
	frame = vs.read()
	frame = frame[1] if args.get("video", False) else frame
	# check to see if we have reached the end of the stream
	if frame is None:
		break
	# resize the frame (so we can process it faster) and grab the
	# frame dimensions
	frame = imutils.resize(frame, width=500)
	(H, W) = frame.shape[:2]

	# check to see if we are currently tracking an object
	if initBB is not None:
		# grab the new bounding box coordinates of the object
		(success, box) = tracker.update(frame)
		# check to see if the tracking was a success
		if success:
			(x, y, w, h) = [int(v) for v in box]
			cv2.rectangle(frame, (x, y), (x + w, y + h),
				(0, 255, 0), 2)
		# update the FPS counter
		fps.update()
		fps.stop()
		# initialize the set of information we'll be displaying on
		# the frame
		info = [
			("Tracker", args["tracker"]),
			("Success", "Yes" if success else "No"),
			("FPS", "{:.2f}".format(fps.fps())),
		]
		# loop over the info tuples and draw them on our frame
		for (i, (k, v)) in enumerate(info):
			text = "{}: {}".format(k, v)
			cv2.putText(frame, text, (10, H - ((i * 20) + 20)),
				cv2.FONT_HERSHEY_SIMPLEX, 0.6, (0, 0, 255), 2)

	# show the output frame
	cv2.imshow("Frame", frame)
	key = cv2.waitKey(1) & 0xFF
	# if the 's' key is selected, we are going to "select" a bounding
	# box to track
	if key == ord("s"):
		# select the bounding box of the object we want to track (make
		# sure you press ENTER or SPACE after selecting the ROI)
		initBB = cv2.selectROI("Frame", frame, fromCenter=False,
			showCrosshair=True)
		# start OpenCV object tracker using the supplied bounding box
		# coordinates, then start the FPS throughput estimator as well
		tracker.init(frame, initBB)
		fps = FPS().start()

	# if the `q` key was pressed, break from the loop
	elif key == ord("q"):
		break
# if we are using a webcam, release the pointer
if not args.get("video", False):
	vs.stop()
# otherwise, release the file pointer
else:
	vs.release()
# close all windows
cv2.destroyAllWindows()
1
2
3
4
5
6
7
8
9
10
11
12
13
14
15
16
17
18
19
20
21
22
23
24
25
26
27
28
29
30
31
32
33
34
35
36
37
38
39
40
41
42
43
44
45
46
47
48
49
50
51
52
53
54
55
56
57
58
59
60
61
62
63
64
65
66
67
68
69
70
71
72
73
74
75
76
77
78
79
80
81
82
83
84
85
86
87
88
89
90
91
92
93
94
95
96
97
98
99
100
101
102
103
104
105
106
107
108
109
110
111
112
113
114
115
116
117
118
119
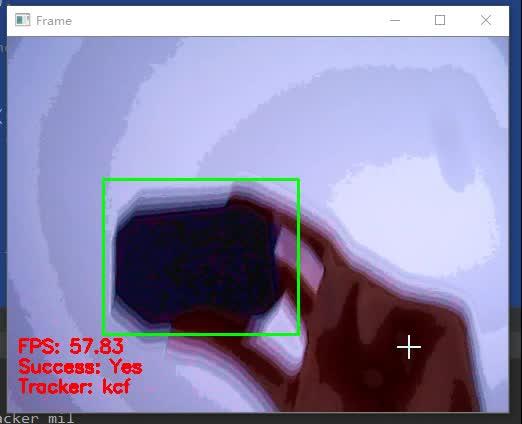
命令行运行:
python opencv_object_tracking.py --tracker kcf
1
结果如下:
 https://www.zhihu.com/video/1225111409124065280 (opens new window)
看起来像目标检测一样,但是用的不是目标检测算法,用的是目标跟踪算法,速度比目标检测快得多。可以看到在CPU上达到了接近60的FPS。
另外关于多目标跟踪可以使用OpenCV中的cv2.MultiTracker_create()。本质是为每一个跟踪目标新建一个跟踪类,然后添加到一个集合中,在每次更新时将所有跟踪目标更新一遍。
编辑 (opens new window)